Thursday, May 30, 2013

Bachelorette

One of my dear friends is getting married!  So of course I wanted her to be able to celebrate in style so I whipped up this bachelorette sash.  Her wedding colors are blue and silver so I went with a blue satin with a white center.  

Satin is super slippery, so I had to extra pin it and go very slow.

I couldn't possibly have a sash without pink, so I chose hot pink iron-on letters. They are very easy to use even on such a touchy fabric.


We had a great time in Nashville and she was the only girl with such a nifty sash!

Sunday, May 26, 2013

Construction Catch-Up


hi blog.  It's been a while.  

It had been my hope to keep up with the blog during the construction, but every last moment of my time has been spent painting.  I have exciting pictures though so here we go!

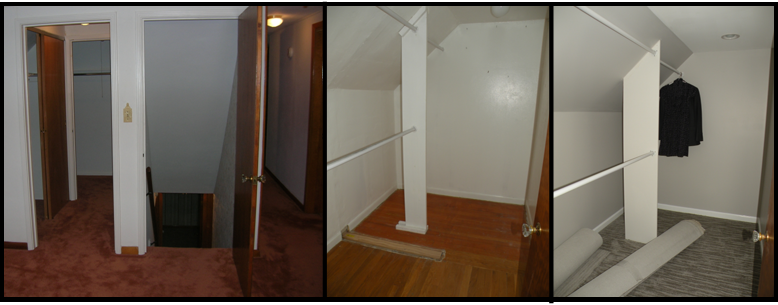
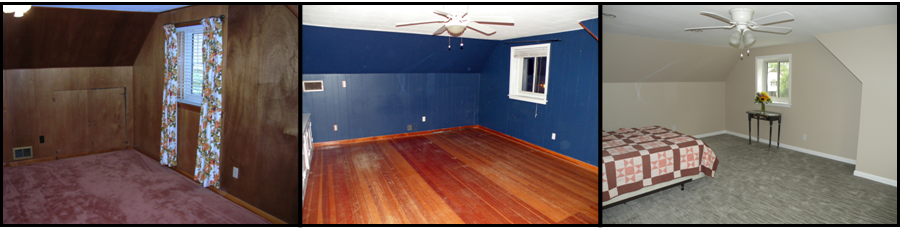
Each grouping below has three pictures.  The first is what the house looked like when we moved in.  (Holy 1970's batman!)  The second picture is how we lived with it for 6 years.  Knowing that one day we would  tear out all the wood paneling and pink tiles, we just made it as neutral as possible.  The last picture is how it looks after construction.  There are still some things left to do, like get the vent covers on and repair the damage from the carpet installers (ugg!) but I am SO. IN. LOVE!!

Here is the floor plan again just for reference.


When we moved in, there was this terrible pinkish-orange carpet.  There were green and orange curtains on every window and pink and tan tile in the bathroom.  Because we knew that we planned to rip everything out, we just wanted to make it bearable until we could do it right.

Bedrooms

We ripped out the carpet hoping for gorgeous hardwood, but what we got was one room of mediocre oak floors and one room of terrible pine floors.  One bedroom was plaster and we painted it tan because the lighter paint hid the textured walls best.  The other room was wood paneling which we painted a dark blue to hide the vertical lines.

This is the bedroom at the top of the stairs (Bedroom 1).  


Just off of bedroom 1 is a walk-in closet.  You can kind-of see in the first picture that the original space was a room with two small closets inside of it.  It was a waste of space.  I ripped all the extra walls out and put back a simple divider with hanging bars.  The new closet is similar but a much better quality.


This is Bedroom 2 (upper left corner of the diagram).  Please note the lovely curtains.


This is still bedroom two (lower left corner of the diagram).  There was a trap door in the wall originally, but it was filled with insulation so it couldn't be used for anything.  


This again is bedroom two (lower right side of bedroom 2).  There was originally a built-in book case and storage cabinets, but they were very poorly made.  I painted them white which made them a little nicer, but they were crap and had to go.  I have yet to figure out how I will replace the storage space but I don't miss them at all.


Bathroom

Now onto the bathroom.  It was by far the biggest change.  When we moved in, I stripped all the floral wall paper and painted everything that wasn't tile plain old white.  You can't see the floor in picture one, but it was carpet.  We ripped that out and I put in 12 inch vinyl white tile.  I can't tell you how satisfying it was to take the whole place to the studs.  

If you are looking at the diagram, this is the left side of the bathroom.


This is the right side of the bathroom.  It really is a HUGE change.  There was a wall that created a little cave of a shower.  The door to the bathroom opened against the wall and made the whole room seem really small.  We took out that wall, put in a pocket door and made the whole space a huge shower.  The room feels enormous now and looks so much more modern.


This is a close up of the floor tile.  It is a filled stone.  We went with a light tan grout so that the color in the stone would pop.  We also opted for the high gloss tile sealer.  We debated the choice for a long time because we both really like the natural stone, but in the end, this seemed much easier to clean.


This is a super-duper close up of the shower tile.  They are actually 10 by 12 inch rectangles.  The grout is the same color as the floor.


The End

In every project there are favorite parts.  For me, this project had two MAJOR upgrades.  I know that seems silly since we ripped out every last thing and replaced it but there are definitely two things that stand out. 

The first upgrade is that we put a light and an exhaust fan in the shower.  Neither of our bathrooms have a fan and it means that everything gets foggy  and it gets really dirty really fast (nothing grows mold like a warm, wet cave...).  It also adds a lot of light to the shower.

The second item that made this makeover is the pocket door.  What a difference it made!  It opened up the space completely.  Instead of opening into the bathroom, it slips behind the shower and leaves the whole room free and clear.


Thanks for playing catch-up with me.  For now it is just a shell, but I will have more pictures and details as we get our own stuff put into the space.

Ta-Ta for now.

Tuesday, March 12, 2013

New Old Project

After much procrastination, I am finally committing to this new old project.  We are very close to my husband's grandparents.  About a year ago, grandma asked me to repair a quilt that her mother had made many years ago.  It is a beautiful dresden plate of which I neglected to take a full picture...

Sixteen blocks sashed in solid blue.  You get the gist. 


When it come into my life, there were a number of issues.  I don't think I really knew what I was getting myself into.  Not because it is so difficult that I can't handle it, but because it needed more love than I initially thought.  I got it all taken apart and repaired the appliqué and then panicked.  They sat like this for a really long time.


All of the squares were different sizes and not one of them was actually a square.  There was up to three-quarters of an inch variation in them.  The first thing I had to do was find the center of each plate and mark it.

I also bought a new large Omnigrid and marked off a 13 inch square.


Once I had my grid taped, I could use my center mark on the dresden plate and the marks on my grid to get the squares cut correctly.


You can see how uneven the sides were when I went to cut them. 


Nothing look prittier than a stack of scraps and a perfictly square stack of blocks!


More later!

Wednesday, March 6, 2013

Winter Wonderland

Although we did not get as much snow in my neighborhood as predicted, I did wake up to a winter wonderland!


Sunday, March 3, 2013

Ohio Sew-In


Kara over at Me and Elna is hosting the first ever Ohio Sew-In.  Of course Kelly and I were quick to sign up!  Unfortunately it isn't until November which seems so far away!  Can't Wait!

Wednesday, February 27, 2013

Paint on my walls!

HOORAY!!!  There is paint on my walls!!! 

Well actually it is primer, but it looks so different with color.  The painting is the only part of this project that we are taking on ourselves.  We had the get the primer on so that our contractor could put up the trim.  We started on Sunday and got almost all done but ran out of paint with two walls left.  Ugg!  So after work on Monday I went back to Lowes and go another gallon of primer (and also paint cause I figured we will need it).  I got home and got the rest of the painting done... or so I thought.  After I had already cleaned up all the paint and showered, I realized I missed a wall.  I know that sounds really silly, but there are a lot of small walls with weird angles, and with two of us painting it over two days I somehow completely missed it.  So yesterday, I came home after work... again... and painted the last wall. 
We are going neutral with everything that is permanent in the space since this isn't our forever-house.  I really like the tan walls (sorry the picture is so terrible I was taking photos in the dark).  I think it will be very bright and airy when it is all done.  Yippie! 

Tuesday, February 26, 2013

My Local Fabric Shop

So I am a little late to the party, but I finally got down to my favorite local fabric shop.
The Fabric Shack in Waynesville, Ohio is my favorite place to go if I really need to roll around in fabric for a while. 
They have a great supply of fabrics regardless of your quilting style.  They have tons of modern fabrics, more traditional lines, and lots of solids.  They have so much the place is bursting at the seams... my kind of place!
I got a call in the morning from my quilting buddy Kelly saying that she was planning to drive out to the Shack (our term of endearment) and that my presence had been requested by her two and a half year old daughter G.  I am just tickled that G associates a trip to the fabric store with spending time with me!  We had a great time.  Kelly was on a fabric mission so G and I checked out all the kids fabric.  I learned all about Yo Gabba Gabba and dinosaurs.  She is a great fabric store buddy!!! 
I wasn't planning on buying anything, but they had all of their clearance fabric on sale for $1.99 a yard.  I couldn't help myself.  I found a couple good ones.  These two I thought were fun blenders.
I bought the rest of the bolt of this one.  I just loved it.  I think it will make a good quilt back.  Unfortunately there was only 2.5 yards left... I would have bought more.
They also have a great selection of fat quarters.  I grabbed a couple blenders to put in the stash.
The trip was totally successful.  I got 5 yards of fabric for $17.75!!! Best. Day. Ever!  Thanks G for inviting me on the fieldtrip!