
hi blog. It's been a
while.
It had been my hope to keep up
with the blog during the construction, but every last moment of my time has
been spent painting. I have exciting
pictures though so here we go!
Each grouping below has three pictures. The first is what the house looked like when
we moved in. (Holy 1970's batman!) The second picture is how we lived with it
for 6 years. Knowing that one day we
would tear out all the wood paneling and
pink tiles, we just made it as neutral as possible. The last picture is how it looks after
construction. There are still some
things left to do, like get the vent covers on and repair the damage from the
carpet installers (ugg!) but I am SO. IN. LOVE!!
Here is the floor plan again just for reference.

When we moved in, there was this terrible pinkish-orange
carpet. There were green and orange
curtains on every window and pink and tan tile in the bathroom. Because we knew that we planned to rip
everything out, we just wanted to make it bearable until we could do it right.
Bedrooms
We ripped out the carpet hoping for gorgeous hardwood, but what
we got was one room of mediocre oak floors and one room of terrible pine
floors. One bedroom was plaster and we
painted it tan because the lighter paint hid the textured walls best. The other room was wood paneling which we
painted a dark blue to hide the vertical lines.
This is the bedroom at the top of the stairs (Bedroom
1).

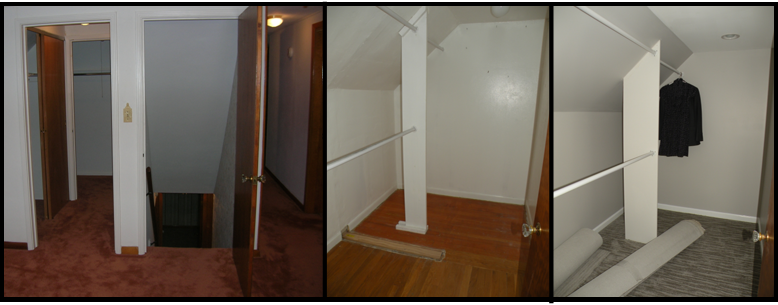
Just off of bedroom 1 is a walk-in closet. You can kind-of see in the first picture that the original space was a room with two small closets inside of it. It was a waste of space. I ripped all the extra walls out and put back a simple divider with hanging bars. The new closet is similar but a much better quality.
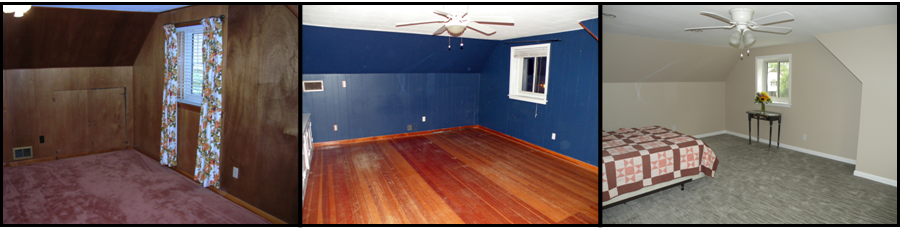
This is Bedroom 2 (upper left corner of the diagram). Please note the lovely curtains.

This is still bedroom two
(lower left corner of the diagram).
There was a trap door in the wall originally, but it was filled with insulation so it couldn't be used for
anything.
This again is bedroom two (lower right side of bedroom
2). There was originally a built-in book case and storage cabinets, but they were very poorly made.
I painted them white which made them a little nicer, but they were crap and had to go. I have yet to figure out how I will replace
the storage space but I don't miss them at all.

Bathroom
Now onto the bathroom. It was by far the biggest change. When we moved in, I stripped all the floral
wall paper and painted everything that wasn't tile plain old white. You can't see the floor in picture one, but it was
carpet. We ripped that out and I put in 12
inch vinyl white tile. I can't tell you
how satisfying it was to take the whole place to the studs.
If you are looking at the diagram, this is the left side of
the bathroom.

This is the right side of the bathroom. It really is a HUGE change. There was a wall that created a little
cave of a shower. The door to the
bathroom opened against the wall and made the whole room seem really
small. We took out that wall, put in a
pocket door and made the whole space a huge shower. The room feels enormous now and looks so much
more modern.

This is a close up of the floor tile. It is a filled stone. We went with a light tan grout so that the
color in the stone would pop. We also
opted for the high gloss tile sealer. We
debated the choice for a long time because we both really like the natural
stone, but in the end, this seemed much easier to clean.

This is a super-duper close up of the shower tile. They are actually 10 by 12 inch rectangles. The grout is the same color as the floor.

The End
In every project there are favorite parts. For me, this project had two MAJOR
upgrades. I know that seems silly since
we ripped out every last thing and replaced it but there are definitely two
things that stand out.
The first upgrade is that we put a light and an exhaust fan
in the shower. Neither of our bathrooms
have a fan and it means that everything gets foggy and it gets really dirty really fast (nothing
grows mold like a warm, wet cave...). It
also adds a lot of light to the shower.
The second item that made this makeover is the pocket
door. What a difference it made! It opened up the space completely. Instead of opening into the bathroom, it
slips behind the shower and leaves the whole room free and clear.

Thanks for playing catch-up with me. For now it is just a shell, but I will have
more pictures and details as we get our own stuff put into the space.
Ta-Ta for now.
No comments:
Post a Comment